Description
This is a quick guide on how to add your Canary IPs to the exclusions or ignore list in the Microsoft Defender portal. It outlines the steps needed to prevent Defender for Endpoint and Defender for Identity from generating alerts. This issue often appears when multiple endpoints port-scan the Canary simultaneously.
📌
Note:
If you're uncertain about the cause of the alerts, feel free to reach out to the Canary support team at support@canary.tools - we're here to help and happy to to check.
We're also working on building some annotations to automatically help identify if Defender is causing the noise.
If you're uncertain about the cause of the alerts, feel free to reach out to the Canary support team at support@canary.tools - we're here to help and happy to to check.
We're also working on building some annotations to automatically help identify if Defender is causing the noise.
Defender for Endpoint:
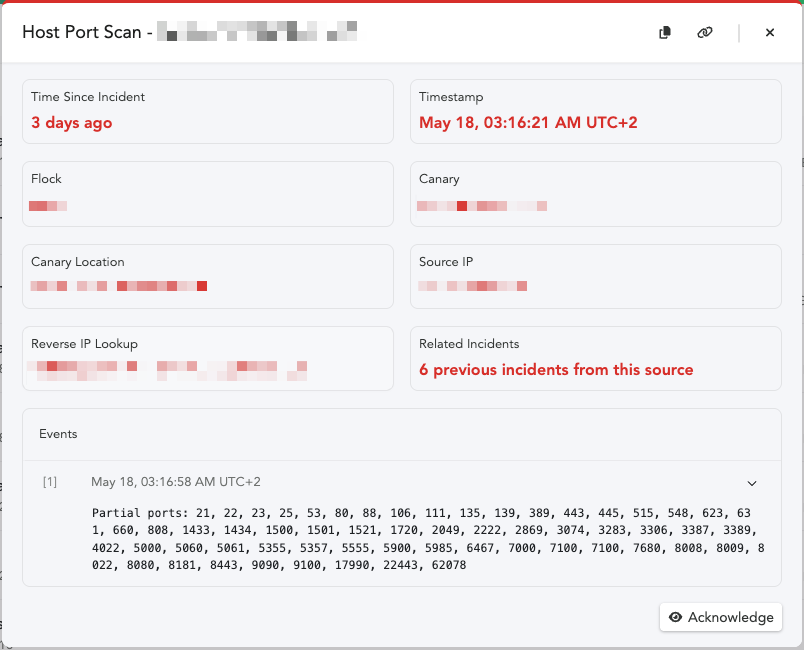
Occasionally performs distributed scans (scans from different endpoints on your network), which will trigger alerts such as the examples below:
Custom TCP Alerts: Note: Look for the string 'NTLMSSP' in the 'Data Received' field.”
Due to this coming from multiple sources, we want to avoid creating blind spots by ignoring this on the Canary Console. Instead, we can centrally add your Canaries to the Defender Portal exclusion lists.
Defender for Identity:
Probes Canary's from a domain controller on ports
TCP/135, TCP/445and TCP/3389. This will trigger the following example alerts:
File Share Logins - (Look out for usernames such as
svc-mdiGMSA$ and svc_defenderMDI$.)Below, we’ve created a handy guide on how to exclude your Canaries from triggering alerts caused by MDE and MDI scanning your network.
Step 1: Collect your Canary IPs
You can find your Canary device IP addresses in the Console by selecting the Settings icon at the top, then navigating to Global Settings > Device IPs.Step 2: Exclude IPs from Device Discovery
- Head over to https://security.microsoft.com/
- In the left panel of the Defender Portal, navigate to System.
- Select Settings.
- Click Device Discovery.
- Select Exclusions.
- Click Add exclusion.
-
In the "IP address or subnet" field, type the exact IP address assigned to your Canary (e.g., 10.0.0.14)
-
(Optional) To exclude more Canaries, click Add more and repeat for each IP.
-
In the Description field, provide a label to identify the exclusion without giving away your honeypots. (i.e, "Contact the Security Team for more information.")
-
Click Save to apply your changes.
Step 3: Exclusions in the Assets list.
Defender will propagate and report vulnerabilities on assets around your network. As we want the Canary's to intentionally stick out for attackers, it's a good idea to exclude them from this list to avoid false positives or unnecessary alerts in your reports.
- In the left pane of the Defender Portal, navigate to Assets.
-
Then select Devices.
3. Search for each of your Canary device IPs individually
- Once you locate the device, click to select it.
- Open the three-dot menu.
-
Select “Exclude” to remove it from asset management.
If a Canary does not show up in the list, you can simply skip over it.
(Optional) Excluding Canary's from Identity.
📌Canary's communicate strictly via DNS, and MDI may report this traffic. We'll want to add an exclusion for this, to avoid a future false positive.Note:
If you make use of Defender for Identity, you'll want to follow these steps too.- In the Defender Portal's left panel, go to System.
- Click Identities.
- Click Global excluded entities.
- In the IP addresses section, click the corresponding button to manage exclusions.
- Enter the IP address of the Canary you'd like to exclude.
- To exclude more devices, click Add and repeat as necessary.
- Click Save at the bottom to apply your changes.
You're done! ;-)