If we don't have a guide available to integrate your SAML provider with your Canary Console, please let us know, and we'll get it added.
This is a generic overview of the setup process and information required for SAML integration:
Step 1: Log in to your Canary Console and copy the SAML parameters
Log in to your Console, click the white Gear Icon on the top right-hand side of your screen, select Global Settings, then expand the SAML section at the bottom of the page.
Step 2: Configure your Identity Provider with a new Service Provider
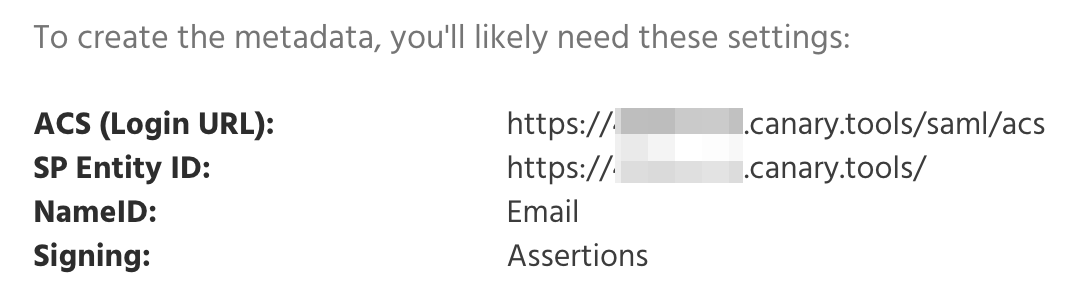
Typically, this involves creating a new app or connection. In setting up this new configuration, look out for these configuration items:
- ACS URL (sometimes called the Login URL or SSO URL). In that field, paste the "ACS" data from Step 1.
- SP Entity ID. This is a unique string that identifies your Canary Console to your Identity Provider. Note that your Console's Entity ID includes a trailing forward slash.
- NameID Format. This tells the Identity Provider how to send a user's identity to the Console. We require an email address.
- Signing. SAML supports the cryptographic signing of the login messages sent from the Identity Provider to the Service Provider. Canary Consoles require that Assertions are signed, and this is usually configurable at the Identity Provider. Responses can be signed; assertions are required to be signed.
Step 3: Download the SAML Metadata
Look around the IdP's interface for a link or button to download the IdP's metadata file.
Step 4: Send us the SAML Metadata
Send the SAML metadata file from Step 3 to us in a support ticket here, and we will configure your Console with the IdP metadata and confirm when SAML support is fully set up.
Step 5: Test login from both the Console and your IdP
You'll know it's working when you see your Console Login page show a Login with SSO button:
Click the button to initiate the SSO login.
You'll also be able to log in to your Console by clicking on your Canary Console's link or button the IdP's dashboard.