Enable Single SignOn from Shibboleth to your Canary Console with these steps.
Shibboleth is highly configurable and the configs provided on this page are but one approach to setting up your Console as a Relying Party. In all the examples below, "XXXXXXXX.canary.tools" should be replaced with your Console's hostname which has a similar format.
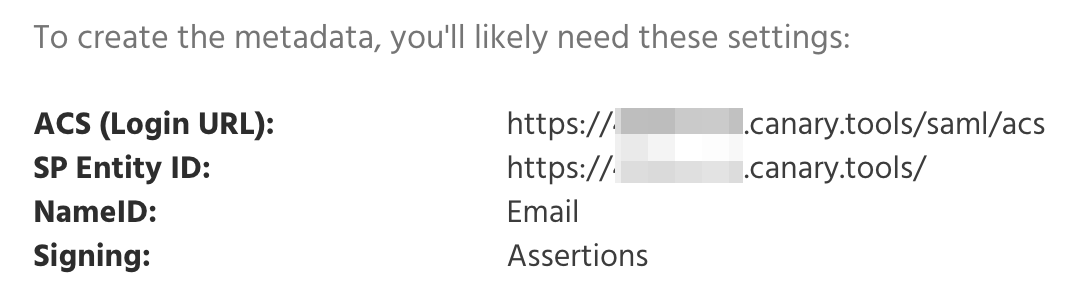
Step 1: Log in to your Canary Console and copy the SAML parameters
Login to your Console, click Setup on the top navbar, then SAML on the left menu:
Step 2: Configure Shibboleth with a new Relying Party
In attribute-filter.xml, add an AttributeFilterPolicy such as:
<AttributeFilterPolicy id="canary">
  <PolicyRequirementRule xsi:type="Requester" value="https://XXXXXXXX.canary.tools/" />
  <AttributeRule attributeID="mail">
    <PermitValueRule xsi:type="ANY" />
  </AttributeRule>
</AttributeFilterPolicy>
Create a metadata file for your new Relying Party (e.g. at /opt/shibboleth-idp/metadata/canary-metadata.xml):
<md:EntityDescriptor xmlns:md="urn:oasis:names:tc:SAML:2.0:metadata" entityID="https://XXXXXXXX.canary.tools/">
  <md:SPSSODescriptor WantAssertionsSigned="true" protocolSupportEnumeration="urn:oasis:names:tc:SAML:2.0:protocol">
    <md:NameIDFormat>urn:oasis:names:tc:SAML:1.1:nameid-format:emailAddress</md:NameIDFormat>
    <md:AssertionConsumerService Binding="urn:oasis:names:tc:SAML:2.0:bindings:HTTP-Redirect" Location="https://XXXXXXXX.canary.tools/saml/acs" index="1"/>
    <md:AssertionConsumerService Binding="urn:oasis:names:tc:SAML:2.0:bindings:HTTP-POST" Location="https://XXXXXXXX.canary.tools/saml/acs" index="1"/>
  </md:SPSSODescriptor>
</md:EntityDescriptor>
In metadata-providers.xml, add a MetadataProvider such as (ensuring the path is valid on your local installation):
<MetadataProvider id="CanaryMetadata" xsi:type="FilesystemMetadataProvider" metadataFile="/opt/shibboleth-idp/metadata/canary-metadata.xml"/>In relying-party.xml, add a RelyingPartyByName bean:
<bean parent="RelyingPartyByName" c:relyingPartyIds="https://XXXXXXXX.canary.tools/">
  <property name="profileConfigurations">
    <list>
      <bean parent="SAML2.SSO" p:encryptAssertions="false" p:signAssertions="true" p:signResponses="false" p:nameIDFormatPrecedence="urn:oasis:names:tc:SAML:1.1:nameid-format:emailAddress" p:encryptNameIDs="false" />
    </list>
  </property>
</bean>
Step 3: Restart Shibboleth
The new configuration will take effect once Shibboleth has been restarted.
Step 4: Send us the IdP's SAML Metadata
Copy the IdP's SAML metadata from the Shibboleth server and send it to us in a support ticket at here and we will configure your Console with the IdP metadata and confirm when SAML support is fully set up.
Step 5: Test login from both the Console and your IdP
You'll know it's working when you see your Console Login page show a Login with SSO button:
Click the button to initiate the SSO login.