Enable Single Sign-On from Keycloak to your Canary Console with these steps.
Step 1: SAML parameters
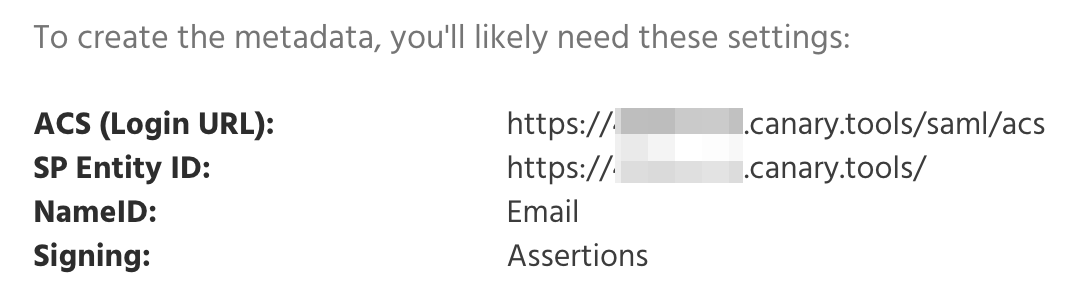
Log in to your Console, click the green Gear Icon on the top right-hand side of your screen, select Global Settings, and scroll down to the SAML section at the bottom of the page. You will find the info for your Console (pictured below) that you'll need later:
Step 2: Keycloak clients configuration
Head over to your Keycloak Administration Console. With your desired realm selected, select Clients and then Create client.
Within our new client, configure the following fields:
- Client Type: SAML
- Client ID: Your unique SP Entity ID URL received from the Canary Console.
- Name: A friendly name.
- Always display in Console: On
Click Save when complete.
Configure the fields below under Access settings:
- Root URL: Your unique SP Entity ID URL received from the Canary Console.
- Valid redirect URIs: Your unique ACS (Login URL) received from the Canary Console.
Configure the following fields under SAML capabilities and Signature and Encryption:
- Name ID format: email
- Sign documents: Off
- Sign assertions: On
Click Save when complete.
Head over to the Keys tab and disable the Signing keys config toggle.
Head over to the Advanced tab and configure the following fields under Fine Grain SAML Endpoint Configuration:
- Assertion Consumer Service Redirect Binding URL — Your unique ACS (Login URL) received from the Canary Console.
Step 3: Assigning users to the Canary Console
Head over to the Roles tab, then select Create role.
Enter a friendly Role name, then click Save.
Head over to Users pane, select the user you'd like to assign access to, then select the Role mapping tab and click Assign role.
In the pop-up, search for and check the Canary Console's role created earlier, then select Assign.
Step 4: SAML Metadata XML
The Canary Support team will need your Keycloak Metadata file. Head over to the Realm settings pane, select the General tab, right-click on the SAML 2.0 Identity Provider Metadata hyperlink, and select Save Link As...
The downloaded saml_metadata.xml file can now be sent to the Canary Support team here to be added to your Console.
Step 5: Login Test
You'll know it's working when your Console Login page shows a Login with SSO button:
Clicking the link will initiate SSO login.